
This is the third and final chapter in the story of Timmy Persson and his homemade jeans. Last time he got as far as having done the back piece and the pockets on the front piece. But before attaching those together Timmy had to put the fly on to the front piece. All of that and more below, but before we get all technical let us introduce the person with the needle and thread in his hands.
Timmy grew up in the small town of Lindesberg a few hours west of Stockholm.
His passion for denim really kicked off when he got a job as a store manager at the Lee-Wrangler Store in Gothenburg. He started to read about denim on blogs to learn as much as possible about the blue gold. He also started experimenting with the sewing machine they had in the store. But even after he got a new job as manager of the jeans department at JC Kompassen he felt that he should be creating jeans instead of selling them.
Therefore Timmy went back to school to fulfill his dreams. He’s currently studying at the Proteko school in Borås. Yet most of what he knows about denim construction comes from hours of self-study and from his girlfriend who is studying to become a garment technician. Timmy’s goal is to learn as much as possible about the craftsmanship of denim and every aspect of dying, weaving and construction. Maybe some day he’ll be able to make a living of it.
But now to the final steps in the making of his jeans.
Step 1:

You start by putting on a piece of denim to cover the back of the fly and then you make the button holes on a separate piece. For aesthetic reasons I use the same fabric on the back of the fly as I did on the linings. Now, put the piece with the button holes on to the “cover-of-the-back” piece, and to strengthen it and to hold it on it’s place make the fly stitch.


 Step 2:

You also need something to put the buttons in. Attach the two front pieces together and make the crotch stich.
Step 3:

Put the front and the back pieces together. Tip: start at the crotch so you have full control over the stiches getting parallel. Flip it over to the right side and make the inner leg stitch.

Step 4:

Turn the jeans inside out again and close the legs with the outer seams. And if you want to eventually end up with the nice “railway tracks” you have to make it extremely straight. Iron the selvedge and make a stitch over the inner pocket edge to keep it in place.


Step 5:

To reinforce the belt loops lock them under the waistband. Attach the waistband with a seam from the inside, flip it over and reinforce it with a stitch. With this stitch you also attach the backside of the waistband.


Step 6:

Place the cinch on to the yoke. The top edges of the cinch should just cross the waistband, so the waistband is also pulled in when you tighten the cinch. Bartack the stress points on the pants and put in the buttons and the rivets. When you make the holes for the rivets you first place the rivet-head exactly where you want it to be, then put some pressure on it, and you will have a small mark where the holes should be.


 Step 7:

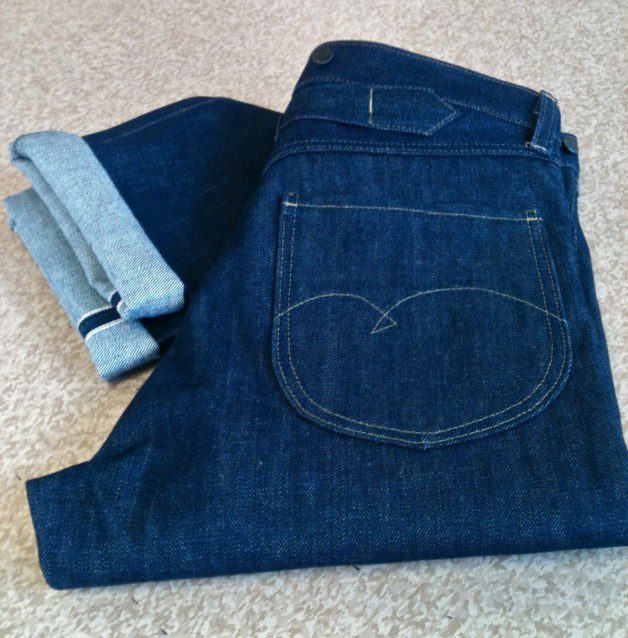
This is how the jeans turned out. In the fitting pictures the jeans have been rinsed and Timmy wore them while they dried up.


Timmy would like to thank you for reading. You can visit his blog Blue Thimble Denim to read more. If you missed part 1 and part 2 of Timmy’s jeans venture just click the links to read up on it.
If you have a similar story or anything else relating to denim or the lifestyle of a denim aficionado that you want to share don’t hesitate to contact us.
Introduction by Thomas Bojer. The rest is written by Timmy Persson.
7 comments
I used this series of articles to make a pair of jeans and they turned out really well. Any idea where can I find a buckle for the cinch though? I haven’t been able to find any online that are the same style as the LVC ones.
Let’s see the jeans Drew 🙂
I used 14.5 oz Red line Selvedge Cone Mills denim and copper rivets. I used a pair of LVC 1967 505 as a model for the pattern but added a button fly, and changed the fit a little bit. The fit could use some tweaks with the back yoke and waistband, but overall came out pretty well.
Here are some pictures
And a fit picture
Great! Do job – was this the first pair of jeans you made?
Yeah, first pair of jeans. I’ve made a few button up shirts before. But this was my first experience starting from scratch making my own pattern. So thank you for the articles. I’m going to start working on a denim jacket next.